
There’s something irresistibly satisfying about the crisp snap of a perfectly dried banana chip-sweet, crunchy, and whispering tales of tropical sunshine with every bite. If you’ve ever wondered how to transform the humble banana into a delightful snack that’s both healthy and addictive, you’re in for a treat. Welcome to the world of “Crunchy Delight: Easy Homemade Banana Chips with a Dehydrator,” where simple kitchen magic turns fresh fruit into golden, crunchy treasures. Whether you’re a seasoned snack enthusiast or a curious beginner, this guide will show you how to achieve that ideal balance of flavor and crunch, all from the comfort of your own home. Get ready to elevate your snacking game with a process that’s as fun as it is rewarding!
- Prep and Cook Time
- Yield
- Difficulty Level
- Ingredients
- Instructions
- Choosing the Perfect Bananas for Ultimate Crispiness
- Mastering the Slice Thickness for Even Dehydration
- Seasoning Secrets to Elevate Your Banana Chips
- Optimal Dehydrator Settings for Perfect Crunch Every Time
- Chef’s Notes
- Serving Suggestions
- Q&A
- The Way Forward
Crunchy Delight: Easy Homemade Banana Chips with a Dehydrator begin with selecting the perfect bananas to guarantee an irresistible crunch in every bite. The journey to ultimate banana chip crispiness starts in the fruit aisle, where careful choice and preparation transform simple bananas into a delightful snack.
Prep and Cook Time
- Preparation: 15 minutes
- Dehydration: 8-12 hours
- Total Time: 8.5 – 12.5 hours
Yield
- Approximately 3 cups of banana chips
- Serves 4-6 as a crunchy snack
Difficulty Level
Easy – Perfect for beginners and seasoned snack makers alike
Ingredients
- 4 ripe but firm bananas (yellow with slight green at the ends for maximum sweetness and crispness)
- 1 tablespoon fresh lemon juice (prevents browning and adds subtle zest)
- 1 teaspoon sea salt (to balance sweetness)
- 1/2 teaspoon ground cinnamon (optional, for warmth)
- 1 tablespoon coconut oil (melted, to lightly coat chips for crunch and sheen)
Instructions
- Choosing the Bananas: Select bananas that are firm with a vibrant yellow peel and minimal spots. Slightly underripe bananas ensure your chips will retain crispness after dehydration without turning mushy.
- Prepare the Slicing: Peel each banana carefully, then slice them evenly into 1/8 inch thick rounds. Using a sharp knife or mandoline ensures slices of uniform thickness, key for even dehydration.
- Treat and Season: In a medium bowl, toss the slices with lemon juice to inhibit browning. Then gently stir in the melted coconut oil, salt, and cinnamon (if using) to coat each slice evenly.
- Arrange on Dehydrator Trays: Place the banana slices in a single layer with space between each piece to encourage airflow and aid crispness. Avoid overlapping for best results.
- Set Dehydrator: Preheat your dehydrator to 135°F (57°C). Dehydrate the banana slices for 8 to 12 hours, turning them halfway through if your machine doesn’t circulate air well.
- Check for Doneness: Your chips should be hard and crispy. Remove them and let cool completely; they will become even more crunchy as they cool.
- Store or Serve: Store in an airtight container at room temperature for up to two weeks or serve immediately to delight guests with fresh, crunchy banana chips.
Choosing the Perfect Bananas for Ultimate Crispiness
For a luxurious crunch, opt for bananas that are firm yet fully yellow with minimal brown spots. Overripe bananas yield sweeter chips but sacrifice crispiness. The naturally dense texture of slightly underripe bananas works harmoniously with dehydration to create a light, brittle chip rather than a chewy one.
Mastering the Slice Thickness for Even Dehydration
Consistency is key – slices cut at exactly 1/8 inch thick dehydrate evenly and quickly, avoiding under- or over-dried pieces. Too thin and chips may burn; too thick and they remain chewy. Using a mandoline slicer can dramatically improve uniformity and turn your banana chips into the perfect crunchy treat.
Seasoning Secrets to Elevate Your Banana Chips
A light sprinkle of sea salt brilliantly offsets natural sugars while a hint of cinnamon creates a warm, irresistible aroma. The subtle coating of coconut oil boosts browning and lends a gorgeous sheen. For adventurous palates, try a pinch of cayenne for spicy-sweet flair or a dusting of smoked paprika for earthy depth.
Optimal Dehydrator Settings for Perfect Crunch Every Time
Dehydrate at 135°F (57°C), the ideal temperature to dry out moisture without cooking your banana slices. This temperature preserves nutrients and flavor. Expect an 8-12 hour window depending on humidity and slice thickness. Rotate trays or flip slices halfway if airflow is uneven to ensure uniform crispiness.
Chef’s Notes
- Substitute avocado oil or melted butter for coconut oil for a different flavor profile.
- Try a sweet-savory blend by adding rosemary and a dash of black pepper.
- If chips aren’t crisping as expected, extend dehydration by 1-2 hours, checking frequently.
- Make ahead and store banana chips in sealed glass jars to maintain crunch longer.
Serving Suggestions
Sprinkle your banana chips over Greek yogurt with honey and granola for a vibrant breakfast, or stir into trail mix for an energizing snack. Garnish with fresh mint, a dusting of cinnamon, or drizzle with dark chocolate for an indulgent touch at parties or family movie nights.

| Nutrition | Amount per Serving |
|---|---|
| Calories | 120 |
| Protein | 1.3 g |
| Carbohydrates | 30 g |
| Fat | 4 g |
For more healthy and delicious homemade snack ideas, check out our dehydrated fruit recipes. Learn more about the science of food dehydration at Science Daily.
Q&A
Q&A: Crunchy Delight – Easy Homemade Banana Chips with a Dehydrator
Q1: What makes banana chips a great snack option?
A1: Banana chips are naturally sweet, crunchy, and satisfying. They pack potassium, fiber, and a subtle tropical flavor into a portable treat that’s perfect for snacking on-the-go or adding a little crunch to your breakfast bowls.
Q2: Why use a dehydrator instead of frying or baking?
A2: Using a dehydrator is a healthier approach because it avoids excess oil and retains more nutrients. It slowly removes moisture, resulting in crisp banana chips without the added fat or the risk of burning as with high-temperature methods.
Q3: What type of bananas are best for making chips?
A3: Firm, slightly underripe bananas work best. They slice easily and hold their shape well during dehydration. Overripe bananas, while sweeter, tend to become too soft and sticky rather than crunchy.
Q4: How thin should the banana slices be?
A4: Aim for slices about 1/8 inch (3 mm) thick. Thin slices dehydrate evenly and become crispier, while thicker pieces may dry unevenly or remain chewy.
Q5: Is there a need to treat the banana slices before dehydrating?
A5: Yes! To prevent browning, it’s recommended to soak the slices in lemon juice or a mild citrus water bath for 5-10 minutes. This step preserves their bright color and adds a refreshing tang.
Q6: How long does it typically take to dehydrate banana chips?
A6: Depending on your dehydrator and slice thickness, banana chips usually take about 6 to 12 hours. They’re done when crisp and no longer flexible.
Q7: Can I add flavors to my banana chips?
A7: Absolutely! Consider sprinkling cinnamon, nutmeg, or a pinch of sea salt before dehydrating. For a savory twist, try a dash of chili powder or smoked paprika. The dehydrator will lock these flavors in, creating a unique taste adventure.
Q8: How should I store homemade banana chips?
A8: Store them in an airtight container at room temperature to keep them crispy. If you live in a humid climate, adding a silica gel packet or a small pinch of rice in the container can absorb excess moisture.
Q9: What creative uses are there for homemade banana chips besides snacking?
A9: Beyond munching straight from the jar, toss banana chips into yogurt parfaits, sprinkle them on oatmeal, blend them into smoothies for texture, or crush them for a crunchy topping on desserts and salads.
Q10: Is making banana chips with a dehydrator cost-effective?
A10: Definitely! Buying bananas in bulk when they’re on sale and preserving them as chips extends their shelf life and reduces food waste. Plus, homemade chips are free from preservatives and additives, making every bite both tasty and wholesome.
With your dehydrator at the ready and these tips in hand, crafting your very own batch of crunchy banana delight is just a slice away!
The Way Forward
As the final crisp bite of your homemade banana chips melts away, you’ll appreciate not just the satisfying crunch but the journey from fresh fruit to delightful snack made right in your own kitchen. With a dehydrator as your trusty companion, creating these golden, naturally sweet treats becomes a simple adventure in healthy snacking. Whether enjoyed straight from the jar or sprinkled over your favorite yogurt, these banana chips bring a wholesome twist to your pantry staples. So next time a craving strikes, remember: a batch of crunchy delight is just a peel and a dehydrator cycle away!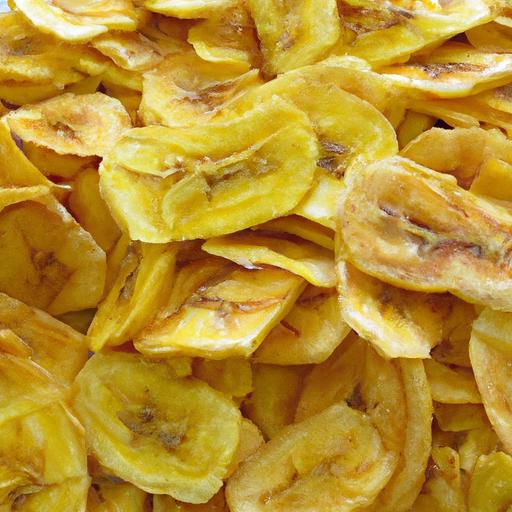


