
Beneath the humble surface of a simple ball of dough lies a world of wonder-a transformative journey where flour, water, yeast, and time converge to create the soft, airy texture that makes bread a beloved staple across cultures. This magical dance, known as proofing, is much more than a waiting game; it’s a delicate interplay of art and science. Unlocking dough’s secret means understanding the invisible life within, the yeast’s quiet fermentation, and the subtle rise that tells a story of chemical alchemy and patient craftsmanship. Join us as we delve into the fascinating realm of proofing, unveiling the techniques and science that turn raw ingredients into golden loaves bursting with flavor and texture.
Unlocking Dough’s Secret: The Art and Science of Proofing
Unlocking dough’s secret is not just about mixing ingredients-it reveals the fascinating science behind yeast activation and dough rise that transforms simple flour and water into clouds of soft, flavorful bread. Throughout my culinary journey, mastering this delicate balance of temperature, humidity, and timing has been the ultimate breakthrough to consistently reliable results and irresistible loaves.
Prep and Cook Time
Preparation: 20 minutes | Proofing: 1 to 3 hours (depending on dough type) | Baking: 25-35 minutes
Yield
1 large loaf (approximately 8 servings) or 12 dinner rolls
Difficulty Level
Medium – Ideal for home bakers ready to elevate their technique
Ingredients
- 3 1/2 cups all-purpose flour, sifted
- 1 1/4 cups warm water (110-115°F)
- 1 packet (2 1/4 tsp) active dry yeast
- 2 tbsp granulated sugar
- 1 1/2 tsp salt
- 2 tbsp olive oil or melted butter
Instructions
- Activate the yeast: In a bowl, dissolve sugar in warm water. Sprinkle the yeast on top and let it bloom for 5-10 minutes until foamy. This ensures yeast is alive and ready to work effectively.
- Mix the dough: In a large mixing bowl, combine sifted flour and salt. Make a well in the center and pour in the yeast mixture and olive oil. Stir gently with a wooden spoon until the dough begins to come together.
- Knead thoroughly: Transfer dough to a floured surface. Knead energetically for 8-10 minutes until the dough is smooth, elastic, and no longer sticky. This develops gluten, giving dough structure and strength.
- First proof: Place the kneaded dough in a lightly oiled bowl, cover with a damp cloth or plastic wrap. Set in a warm, draft-free area at about 75-80°F with 75% humidity. Allow dough to rise until doubled in size, roughly 1-2 hours.
- Punch down and shape: Gently deflate the dough to release excess gas. Shape into a loaf or rolls and place in greased pans or on a parchment-lined sheet.
- Second proof: Cover and let the shaped dough rest at the same warm temperature for 45 minutes to 1 hour, until it puffs up visibly.
- Bake to golden perfection: Preheat oven to 375°F. Bake the loaf or rolls for 25-35 minutes until the crust is deep golden and sounds hollow when tapped.
- Cool properly: Transfer baked goods to a wire rack. Cooling for at least 20 minutes prevents sogginess and finishes the baking process internally.
Chef’s Notes: Mastering Temperature and Humidity for Optimal Proofing
The key to perfect proofing lies in creating an environment where your dough feels cozy without overheating. Active dry yeast thrives between 75-85°F; temperatures above 110°F can kill it. Use a proofing box or warm oven with the light on to maintain consistent warmth. Maintaining humidity around 70-80% prevents dough skin from drying out, so covering dough snugly with plastic wrap or a damp kitchen towel is essential.
A tip I always share: a warm water bath filled with hot water beside your covered dough is a simple way to boost room humidity in cooler kitchens.
If you notice dough rising too fast and collapsing, reduce temperature or shorten proofing time. For slower rises, slightly increase warmth but never rush with high heat.
Techniques to Perfect Proofing Times for Different Doughs
Heavier doughs with whole grains or added fats usually require longer proofing-often an extra 30-60 minutes-as yeast needs more time to ferment enzymes. Conversely, lean doughs made of basic flour, water, yeast, and salt rise faster.
Use the “poke test” for best results: gently press your finger into dough. If the indentation springs back slowly and incompletely within 3 seconds, it’s perfectly proofed and ready to bake. If it rebounds immediately, it needs more time; if it doesn’t bounce back at all, it may be over-proofed.
Troubleshooting Common Proofing Issues for Consistent Results
- Dough Not Rising: Check yeast freshness and water temperature. Yeast older than 6 months or water above 120°F can hinder activation.
- Dense or Heavy Loaf: Avoid adding too much flour during kneading. Dough should be slightly tacky. Also, under-proofing can reduce volume.
- Over-proofed Dough: Results in collapse or large air pockets. If over-proofed, reshape gently and proof again briefly.
- Crust Too Thick: Introduce steaming in the first 10 minutes of baking by placing a pan of water below the rack to keep the surface moist.
Serving Suggestions
Present your beautifully proofed and baked bread warm with softened butter and a sprinkling of flaky sea salt. For an elevated touch, slice and toast with avocado smash and microgreens or serve alongside robust soups and artisan cheeses.
Fresh herbs such as rosemary or thyme nestled on the side add an aromatic, rustic charm that’s irresistible. Store leftovers wrapped in a linen towel inside a bread box to retain the delicate crumb texture.

| Nutrient | Amount per Serving |
|---|---|
| Calories | 180 kcal |
| Protein | 6 g |
| Carbohydrates | 36 g |
| Fat | 3 g |
For deeper insights into the role of yeast and fermentation in baking, check out this ScienceDirect article on yeast fermentation. Also, don’t miss our related post on how to maintain a sourdough starter for an artisanal twist on your bread journey.
Q&A
Q&A: Unlocking Dough’s Secret – The Art and Science of Proofing
Q1: What exactly is proofing in the world of baking?
A1: Proofing, sometimes called the “final rise,” is the magical resting phase where dough takes center stage, allowing yeast to feast, ferment, and release gas bubbles that transform a dense mass into a light, airy masterpiece. It’s the artful pause before your bread gets its golden glow in the oven.
Q2: Why does proofing matter so much?
A2: Think of proofing as dough’s beauty sleep. Without it, bread remains heavy and flat. This process not only develops flavor through fermentation but also builds the perfect crumb structure and texture. Proofing breathes life into your dough, unlocking its full potential.
Q3: How long should one proof dough for the best results?
A3: Ah, the timeless question! Proofing time depends on ingredients, temperature, and desired bread style. Typically, 1 to 2 hours at room temperature works, but slower, cooler proofs can last 8+ hours for deeper flavor. Like all great art, timing is a blend of science and intuition.
Q4: Can proofing go wrong? What should one watch out for?
A4: Absolutely! Over-proofed dough becomes overly soft and can collapse, losing its rise and texture. Under-proofed dough won’t develop enough gas or flavor, leading to dense bread. Keeping a keen eye on dough’s size-about doubled-and a gentle finger poke test can save the day.
Q5: What environmental factors influence proofing?
A5: Temperature and humidity are the dynamic duo of proofing. Warmer, humid conditions speed up yeast activity, while cooler, drier environments slow it down. Master bakers adjust proofing conditions like conductors tuning their orchestra to achieve perfect harmony.
Q6: Are there any tech tricks or tools to help with proofing?
A6: Modern baking benefits from proofing boxes, warm ovens with the light on, or even dedicated proofer machines that maintain ideal warmth and humidity. These tools provide consistency, making it easier to unlock dough’s secret with scientific precision.
Q7: How does proofing affect the flavor of bread?
A7: The longer the proof (within reason), the richer and more complex the flavor, as organic acids and alcohol develop during fermentation. Proofing is where simple ingredients morph into an orchestra of yeasty, tangy, sweet, and nutty notes-a true sensory pleasure.
Q8: Can proofing techniques vary across different types of bread?
A8: Yes! Artisan sourdough, for instance, demands longer, slower proofs often in cool conditions to cultivate its signature tang and texture. Quick breads might require little to no proofing. Understanding each bread’s character unlocks the right proofing rituals.
Q9: What’s a simple test to know if dough is properly proofed?
A9: The classic “poke test” does the trick: gently press your finger into the dough. If the indentation springs back slowly but stays visible, it’s ready. If it snaps back immediately, more time is needed; if it stays indented and dough collapses, it’s over-proofed.
Q10: What’s the takeaway for novice bakers eager to master proofing?
A10: Patience and observation are your best friends. Embrace proofing as part science, part art, and part meditation. Watch your dough, feel its texture, and learn its rhythm. Unlocking proofing’s secret isn’t just about technique-it’s about connecting with the alchemy of baking.
In Conclusion
As the final rise gently ushers your dough from humble mixture to sumptuous promise, the art and science of proofing reveal themselves not just as culinary techniques, but as the heartbeat of baking itself. Unlocking dough’s secret is more than patience and temperature; it’s a delicate dance of time, environment, and instinct. Whether you’re a curious novice or a seasoned artisan, embracing the nuances of proofing transforms simple ingredients into golden masterpieces. So next time you cradle your dough, remember: within its quiet swell lies the magic waiting to be unveiled-one perfect rise at a time.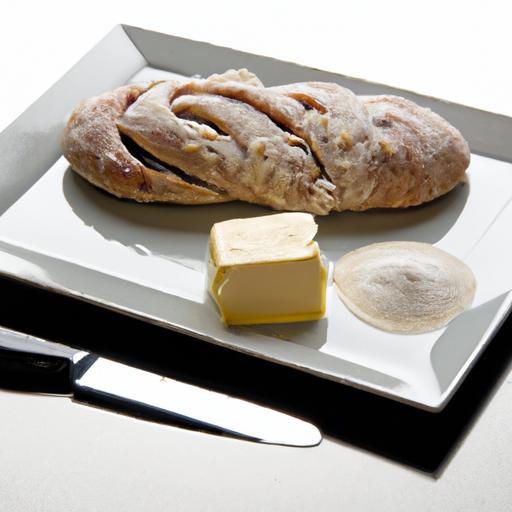


