
In a world where convenience often trumps tradition, there remains a magical corner of the kitchen where time slows, and age-old secrets are lovingly passed down-Grandma’s kitchen. Among her treasured recipes, none shines quite as brightly as her from-scratch cannoli. This isn’t just a dessert; it’s a story baked into every crispy shell and creamy filling. Grandma’s timeless guide to perfect from-scratch cannoli invites you to step behind the rolling pin and discover the art of crafting this Sicilian delight exactly as generations before her have done-rich with history, bursting with flavor, and lovingly handmade, every time. Whether you’re a seasoned baker or a curious novice, prepare to uncover the essence of tradition, technique, and taste that turns simple ingredients into a celebration of heritage and sweetness.
- Grandma’s Secret Ingredient for Irresistibly Crispy Shells
- Prep and Cook Time
- Yield
- Difficulty Level
- Ingredients
- Instructions
- Tips for Shaping and Frying Cannoli Like a True Artisan
- Creative Twists to Elevate Your Classic Cannoli Recipe
- Chef’s Notes & Tips for Success
- Serving Suggestions
- Q&A
- Insights and Conclusions
Grandma’s Secret Ingredient for Irresistibly Crispy Shells
Grandma’s Timeless Guide to Perfect From-Scratch Cannoli starts with a magic touch that transforms ordinary dough into delightfully crisp, golden shells. The secret? A blend of white wine and vinegar incorporated into the dough. This combination relaxes the gluten, allowing the shells to fry evenly and stay crunchy without becoming heavy or greasy. As you roll the dough paper-thin, it promises a perfect bite – light, shatteringly crisp, and utterly addictive.
Prep and Cook Time
- Preparation: 30 minutes
- Resting Time: 1 hour (for dough relaxation)
- Cooking Time: 10 minutes
Yield
- Approximately 12 cannoli shells with filling
Difficulty Level
- Medium – Requires some technique, but very rewarding
Ingredients
- For the Cannoli Shells:
- 2 cups all-purpose flour, sifted
- 1 tbsp granulated sugar
- 1/2 tsp fine sea salt
- 2 tbsp unsalted butter, softened
- 1/2 cup dry white wine (such as Pinot Grigio)
- 1 tbsp white vinegar or apple cider vinegar
- 1 large egg yolk
- Vegetable oil, for frying (about 3 cups)
- For the Silky Ricotta Filling:
- 2 cups whole-milk ricotta, well drained
- 3/4 cup powdered sugar, sifted
- 1 tsp pure vanilla extract
- 1/4 cup mini chocolate chips or finely chopped dark chocolate
- Zest of 1 organic orange (optional)
- 1 tbsp pistachios, finely chopped (for garnish)
Instructions
- Prepare the dough: In a large bowl, whisk together flour, sugar, and salt. Add the softened butter and work it in with your fingers until crumbly.
- Mix liquids: Beat together the egg yolk, white wine, and vinegar. Gradually pour this into the flour mixture, stirring with a fork until a shaggy dough forms.
- Knead the dough: Transfer dough to a lightly floured surface and knead for about 8-10 minutes until smooth and elastic. Wrap in plastic wrap and refrigerate for 1 hour to rest.
- Roll and cut: Divide dough into 2 portions. Roll each portion as thin as possible (about 1/16 inch) using a floured rolling pin. Cut into 4-inch circles using a cookie cutter or glass.
- Form shells: Wrap each dough circle around a greased cannoli tube, sealing the edges with a little water. Ensure a snug fit to prevent opening during frying.
- Heat oil: In a heavy-bottomed pot or deep fryer, heat vegetable oil to 350°F (175°C). Use a thermometer for accuracy to ensure perfect frying temperature.
- Fry shells: Carefully lower a few tubes into the hot oil, frying until golden and crisp, about 1-2 minutes. Remove with slotted spoon and gently slide shells off tubes while still warm. Cool on paper towels.
- Prepare filling: In a mixing bowl, whisk the drained ricotta with powdered sugar and vanilla extract until smooth and creamy. Fold in chocolate chips and orange zest gently for bursts of flavor.
- Fill cannoli: Just before serving, pipe or spoon ricotta filling into the cooled cannoli shells. Avoid filling too far in advance to keep shells crisp.
- Garnish and serve: Dip cannoli ends in chopped pistachios for color and crunch. Serve immediately for maximum delight.
Tips for Shaping and Frying Cannoli Like a True Artisan
- Use a pasta machine to roll dough ultra-thin and even – this ensures shatteringly crisp shells.
- Keep your frying oil between 350-360°F; cooler oil yields greasy shells, hotter oil burns dough fast.
- Fry a test shell first to check for oil temperature and dough thickness.
- Always remove shells from tubes while warm. If they cool on tubes, they stick and crack when removed.
- Dry ricotta overnight in a fine-mesh sieve to prevent watery filling and soggy shells.
Creative Twists to Elevate Your Classic Cannoli Recipe
Infuse your ricotta filling with unexpected delights like a splash of Amaretto liqueur or orange flower water for extra aroma. Swap traditional chocolate chips for crushed candied ginger, toasted coconut flakes, or pistachio praline to customize your flavor profile. For the shells, try dusting with a cinnamon-sugar blend right after frying for a warm spice contrast.
Chef’s Notes & Tips for Success
- Drain ricotta thoroughly to avoid runny filling that compromises shell crunch.
- If dough feels sticky, chill it longer before rolling to improve handling.
- Store unfilled shells in an airtight container for up to 3 days; fill only when ready to eat.
- To make cannoli the night before, prepare dough and filling separately, fry shells on the day of serving, and assemble last minute.
- Learn how to make homemade ricotta for the freshest, creamiest base.
- For detailed frying safety, visit Foodsafety.gov.
Serving Suggestions
Serve your cannoli on a rustic wooden platter dusted lightly with powdered sugar, alongside freshly brewed espresso or a homemade berry compote for dipping. Add vibrant candied orange peel or edible flowers for visual contrast and seasonal freshness. These treats shine at celebrations or as the perfect cozy dessert after a family dinner.
| Nutrient | Per Cannoli (with filling) |
|---|---|
| Calories | 320 |
| Protein | 8g |
| Carbohydrates | 32g |
| Fat | 18g |

Q&A
Q&A: Grandma’s Timeless Guide to Perfect From-Scratch Cannoli
Q1: What makes Grandma’s cannoli recipe so special compared to store-bought versions?
A1: Grandma’s recipe is a labor of love passed down through generations, capturing authentic Italian tradition with every crunchy shell and creamy filling. Unlike store-bought cannoli, which can be overly sweet or soggy, her from-scratch approach ensures a fresh, delightfully crisp shell paired with a rich, balanced ricotta filling that melts in your mouth.
Q2: Can beginners realistically try making cannoli from scratch using this guide?
A2: Absolutely! Grandma’s guide is designed with clarity and patience, breaking down each step with helpful tips and little secrets. Even if you’re new to pastry-making, the instructions will make the process approachable and rewarding, transforming novice bakers into proud cannoli creators.
Q3: What secret ingredient or technique does Grandma use to perfect the cannoli shells?
A3: The magic lies in the dough’s texture-a delicate balance of flour, sugar, and a splash of white wine to tenderize and add subtle flavor. Grandma also emphasizes chilling the dough before rolling and deep-frying it to golden perfection in small batches, ensuring the shells stay crispy without absorbing too much oil.
Q4: How does Grandma achieve that classic creamy ricotta filling?
A4: She starts with fresh, high-quality ricotta cheese, gently strained to remove excess moisture. Then, she sweetens it lightly with powdered sugar and a touch of vanilla extract, folding in finely chopped candied fruit or dark chocolate chips for a delightful texture contrast. Her secret? A hint of cinnamon for warmth and complexity.
Q5: Can this recipe be adapted for dietary restrictions, like gluten-free or vegan options?
A5: Yes! While Grandma’s traditional recipe calls for wheat flour and dairy ricotta, modern substitutions can create wonderful variations. Gluten-free flour blends can replace wheat flour for the shells, and vegan ricotta made from cashews or tofu can mimic the creamy filling. The key is to maintain the dough’s pliability and filling’s smoothness for that authentic cannoli experience.
Q6: How should homemade cannoli be stored to maintain their crispness?
A6: Cannoli are best enjoyed fresh to preserve the shell’s crunch. However, if you must store them, keep the shells and filling separate. Shells can be stored airtight at room temperature, and the filling refrigerated. Assemble just before serving to prevent sogginess, ensuring each bite stays perfectly crisp and creamy.
Q7: What personal tips does Grandma offer for creating memorable moments with homemade cannoli?
A7: Grandma believes the joy of making cannoli lies not just in the taste but in the shared experience-gathering family to roll dough, fry shells, or spoon the luscious filling together. She encourages celebrating imperfections, savoring laughter, and passing down the recipe as a delicious legacy filled with love.
Insights and Conclusions
As you close the chapter on Grandma’s timeless guide to perfect from-scratch cannoli, you’re not just walking away with a recipe-you’re carrying forward a legacy of love, tradition, and culinary magic. These crispy shells filled with luscious ricotta remind us that the sweetest moments in life are crafted with patience, care, and a pinch of nostalgia. So, don your apron, roll up your sleeves, and let every bite transport you to a sunlit kitchen where stories are shared and memories are made. After all, the perfect cannoli isn’t just a dessert-it’s a delicious link to the past, a celebration of the present, and a treasure for the future. Buon appetito!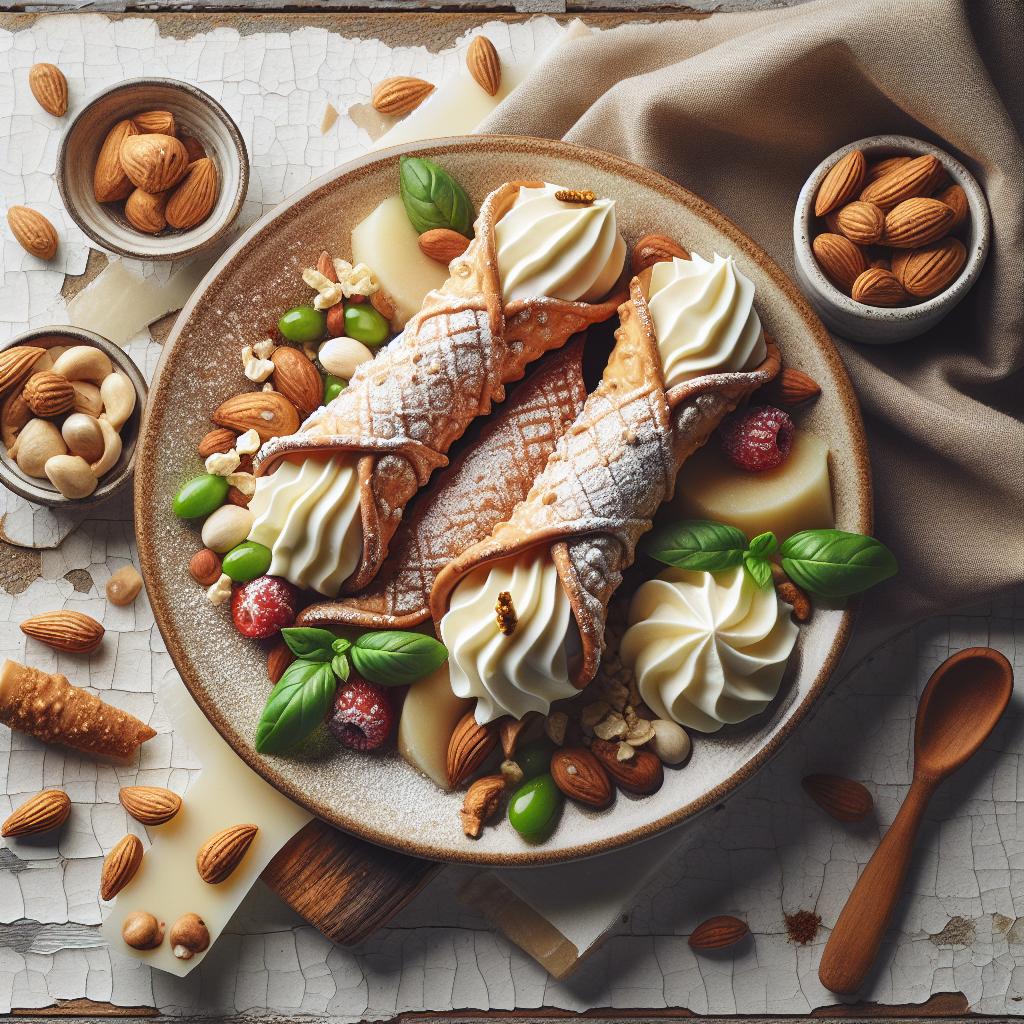


