
In the enchanting world of bread making, there exists a secret ritual that transforms simple flour and water into a symphony of texture and flavor. Known as autolyse, this magical pause in the baking process holds the key to unlocking dough’s true potential. But what exactly is autolyse, and why has it become a beloved technique among artisanal bakers around the globe? Join us as we unravel the science and artistry behind autolyse, revealing how this humble step can elevate your bread from ordinary to extraordinary. Whether you’re a curious novice or a seasoned flour enthusiast, prepare to discover the dough magic that lies just beneath the surface.
Unlocking Dough Magic: What Is Autolyse in Bread Making?
Unlocking dough magic begins with understanding autolyse, a pivotal technique in bread making that transforms simple ingredients into a masterpiece of texture and flavor. This natural resting phase combines flour and water before adding yeast and salt, allowing the flour to hydrate fully and the gluten to develop gently. You might wonder how this simple step can revolutionize your bread. Drawing from centuries of artisan baking wisdom, autolyse creates dough that’s more extensible, easier to shape, and ultimately yields a crumb with impressive structure and a deeply nuanced taste. Let’s dive deep into the science and craft behind autolyse and unlock the secrets to perfecting your loaf’s texture.
Prep and Cook Time
- Preparation: 15 minutes
- Autolyse Rest: 30-45 minutes
- Bulk Fermentation: 2-3 hours
- Baking: 35-45 minutes
- Total Time: Approximately 4 hours
Yield
Makes 1 large artisan loaf (about 800g) or 2 smaller loaves.
Difficulty Level
Medium – Ideal for home bakers eager to deepen their skills with artisan techniques.
Ingredients
- 500g bread flour (preferably unbleached, high-protein)
- 350g water (lukewarm, about 75°F/24°C)
- 10g fine sea salt
- 7g active dry yeast or instant yeast
Instructions
- Mix Flour and Water: In a large bowl, combine 500g bread flour and 350g lukewarm water using your hands or a wooden spoon. Stir only until no dry spots remain; the dough will be shaggy and sticky. This simple blend initiates hydration and begins gluten strand formation.
- Rest – The Autolyse Phase: Cover the bowl with a damp towel or plastic wrap. Let the dough rest at room temperature for 30 to 45 minutes. During this time, enzymes break down starch and proteins, softening the flour and allowing gluten to develop naturally without kneading.
- Add Salt and Yeast: Sprinkle salt and yeast evenly over the dough. Incorporate them thoroughly by folding and gentle kneading. Avoid overworking-the goal is to maintain the elasticity developed in autolyse.
- Bulk Fermentation: Cover again and let the dough ferment for 2 to 3 hours, folding every 30 minutes to strengthen gluten strands. You’ll notice the dough rise, develop bubbles, and gain springiness-key indicators of proper fermentation.
- Shape the Loaf: Lightly flour your surface and gently shape the dough into your preferred form, whether boule or batard. Place it in a floured proofing basket or bowl and allow it to proof for another 1 to 1.5 hours until nearly doubled.
- Preheat and Bake: Heat your oven to 450°F (230°C), ideally with a baking stone or Dutch oven for steam retention. Score the loaf with a sharp blade, creating decorative slashes. Bake for 35 to 45 minutes until the crust is deep golden brown and crisp.
- Cool and Serve: Let the bread cool completely on a wire rack to finish cooking internally. This step is crucial for developing crumb texture.
Tips for Success: Maximizing Flavor and Crust with Autolyse
- Use high-quality, fresh flour for optimal enzyme activity during autolyse.
- Adjust water temperature based on ambient conditions – cooler water slows fermentation, warmer speeds it up.
- For richer flavor, extend autolyse to 60 minutes, but don’t add yeast or salt until after.
- Salt inhibits enzyme action during autolyse; adding it later enhances gluten development and flavor layering.
- Use a Dutch oven during baking to trap steam and encourage a crispy, blistered crust.
- Experiment with whole wheat or rye flour in your autolyse for complex flavor profiles.
Serving Suggestions
This artisan bread shines when paired with fresh butter and a sprinkle of flaked sea salt. Serve alongside rustic cheeses, vibrant olive tapenade, or as the base for open-faced sandwiches piled with seasonal roasted vegetables. For a visual delight, garnish with fresh herbs like rosemary or thyme on the serving platter. Toast thick slices to highlight the perfect crumb structure you’ve unlocked with autolyse – the soft interior contrasts wonderfully with the satisfyingly crisp crust, making every bite a textural journey.

| Nutrient | Amount per Serving |
|---|---|
| Calories | 220 kcal |
| Protein | 7g |
| Carbohydrates | 45g |
| Fat | 1g |
For those inspired to explore further, check out our Artisan Bread Baking Tips, or deepen your understanding of gluten science with research from the Journal of Cereal Science.
Q&A
Q&A: Unlocking Dough Magic – What Is Autolyse in Bread Making?
Q1: What exactly is autolyse in bread making?
A1: Autolyse is a clever little resting period in bread baking where flour and water get cozy before yeast or salt join the party. During this quiet time, flour’s proteins absorb water, gluten starts forming, and enzymes get to work breaking down starches-setting the stage for a dough that’s easier to handle and results in bread with better texture and flavor.
Q2: Why do bakers swear by autolyse?
A2: Because it’s like giving your dough a head start! Autolyse improves gluten development naturally, reduces mixing time, enhances dough extensibility, and leads to bread with a more open crumb and a richer aroma. Essentially, it makes the dough more elastic and the baking process more forgiving-magic happens under the surface!
Q3: How long should this dough daydream last?
A3: Typically, anywhere from 20 minutes to an hour is enough for autolyse. Some artisan bakers stretch it out even longer for deeper flavor and texture. The key is to find the sweet spot: too short, and the benefits are minimal; too long, and the dough might start fermenting prematurely.
Q4: Can salt and yeast be part of the autolyse mix?
A4: Traditionally, no. Salt is usually added after autolyse because it tightens gluten strands and can slow enzyme activity, while yeast is held back to prevent early fermentation. That said, some bakers experiment by adding small amounts of yeast, but the classic method keeps it simple-just flour and water enjoying their moment.
Q5: Does autolyse work with all types of flour?
A5: Absolutely, but results vary. High-protein flours like bread flour benefit greatly because they develop stronger gluten networks. Whole grain flours, with their bran bits, also respond well but may require tweaks in timing due to their different absorption rates and enzymatic activity.
Q6: How can I tell if autolyse did its job?
A6: After autolyse, your dough will feel noticeably smoother, more extensible, and less sticky. It’s like the flour and water have become best friends, resulting in a more supple dough that’s a dream to knead or fold.
Q7: Is autolyse only for professional bakers?
A7: Not at all! Autolyse is a simple technique that can turn your home baking from ordinary to extraordinary. Giving your flour and water time to mingle before the chaos of mixing and kneading can significantly improve your bread’s texture and flavor without any special equipment.
Q8: Can autolyse be skipped?
A8: Sure, but your bread might miss out on some of that magic. Skipping autolyse usually means longer mixing times and a dough that’s tougher to work with. If you’re in a rush, no worries-but if you want that artisan-quality crumb and flavor, giving autolyse a try is definitely worth it.
Q9: How does autolyse affect the final bread?
A9: It influences several delightful traits-airier crumb, more complex flavor from enzymatic activity, improved crust, and dough that’s more manageable. The end result is bread that’s lighter, tastier, and has that subtle bakery charm.
Q10: Ready to unlock the magic? How do I start?
A10: Mix your flour and water gently until just combined, then let the mixture rest, covered, for around 30 to 45 minutes. Afterward, add your yeast and salt, then continue with your usual mixing and kneading. Watch as your dough transforms into something wonderfully workable-this is autolyse in action, your secret weapon for bread brilliance!
Closing Remarks
As the last grains of flour settle and water weaves its quiet spell, autolyse reveals itself not just as a step, but as a gentle catalyst-unlocking dough’s hidden potential with minimal effort. By embracing this simple pause, bakers invite time and nature to work their quiet magic, enhancing gluten development, flavor depth, and texture in ways that kneading alone can’t achieve. Whether you’re a seasoned artisan or a curious home baker, understanding autolyse transforms your bread-making from a routine into a ritual-one where patience and science blend seamlessly, yielding loaves that tell a story as rich as their crumb. So next time you mix your flour and water, remember: in that brief moment of stillness lies the secret to dough’s true magic. Happy baking!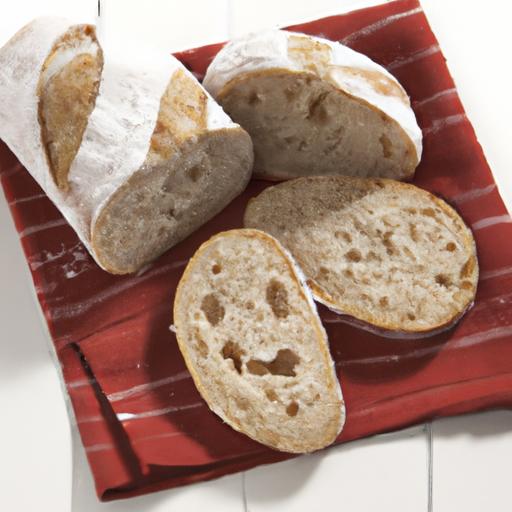


